Friday, August 9, 2013

Running Man

Yoo Jae Suk


Kang Gary


Monday, August 6, 2012

Sunday, June 17, 2012


Like her hair style....

Saturday, December 31, 2011

Tuesday, August 2, 2011

Change columns to rows and vice versa using PIVOT-UNPIVOT

PIVOT

See table below:
TbSummary


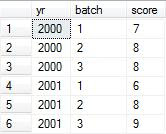
Using pivot, we can change rows to columns, so data can be displayed as below:


PIVOT Syntax:
SELECT [new column 1], [new column 2], [new column 3],…
FROM
(
SELECT * FROM [Source Table]
) AS [alias for source table]
PIVOT
(
[AGGREGATE FUNCTION]([value column]) FOR [header column]in ([new column 1], [new column 2], [new column 3],…)
)
AS [alias for pivot table]


Example of query:
SELECT yr, [1], [2], [3]
FROM
(SELECT * FROM TbSummary) AS a
PIVOT
(
SUM(score) FOR batch in ([1], [2], [3])
)
AS b


UNPIVOT

See the tables below:
TbData


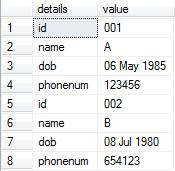
In contrary with PIVOT, UNPIVOT is used to change columns to rows. So here, we’re going to display the data as below:


UNPIVOT Syntax:
SELECT [new column 1], [new column 2]
FROM
(
SELECT
[column1],
[column2],
...
FROM [Source Table]
) [alias for source table]
UNPIVOT
(
[new column 2] FOR [new column 1] IN ([column1],[column2],...)
) AS [alias for unpivot table]


Example of the query:
SELECT details, value
FROM
(
SELECT
CAST (id AS varchar) AS id,
CAST ([name] AS varchar) AS [name],
CAST(gender AS varchar) AS gender,
CONVERT(varchar,dob,106) AS dob,
CAST (phonenum AS varchar) AS phonenum
FROM TbData
) a
UNPIVOT
(
value FOR details IN (id, [name], gender, dob, phonenum)
) AS b

Saturday, July 16, 2011

Friday, May 6, 2011

Switch User Option Disappear from Windows?

As we know “Switch User” option in Windows allows user to log off from current user and log on to a new user.
How if the option disappear from your Windows?

No worry, here's how to make it appears:
1. Go to [Start] > [Control Panel] > [User Accounts]
2. Select "Change the way users log on or off"
3. And you might receive a prompt like this: "Fast User Switching cannot be used because Offline Files is currently enabled. To make changes to Offline Files, click OK."
4. If that so, just click OK, so that "The Offline Files Settings" dialog box appears, select "clear the Enable Offline Files" check box, and then click OK
5. Back to step 2 to select the "Use Fast User Switching" check box, and then click Apply Options
6. Now the "Switch User" option is available on your Windows